How to win Pawn Endgames When you have King and Pawn vs King ?

The first truly *must know* king and pawn ending! Master this Drill and you'll be able to win games with the smallest of advantages. Since you can't mate with a pawn, you need to promote to a queen (and we assume you've already mastered the King And Queen Mate Drill?).
"With equal material, n unequal pawn ended in most of the games but with a single and opposition will lead to a win"
Topics That we cover in this blog is :
- Opposition
- Diagonal Opposition
- Long distant Opposition
- Rule of Square 4.a) Reti Manuever
- Triangulation
- When King is ahead of 1 square from the Pawn.
- When King is ahead of 2 Square from the pawn.
- When King is on 6th Rank.
- What if the pawn is closer to the edge of the board.
- Rooks pawn is usually drawn.
Let’s try to get to this position now from further out.
How to draw with a lone king vs a Pawn and king?
Who has the opposition? That’s the deciding question in this position. White to play is a draw, black to play is a win for white.
Understanding the principle of opposition, which essentially consists of blocking the opponent’s King with one’s own, and forcing it to choose one side to go and thereby concede space on the other side.
Similar to the long-distance opposition is the diagonal opposition, which again aims to convert into a classical opposition and consequent outflanking of the opponent. Diagonal oppositions can also be distance, but in this case, we’re looking at short-distance ones. The opposition in all its various forms is absolutely essential for an advanced understanding of the endgame and should be practiced as often as you can until you have it at an instinctive level.
 |
| White to Play win! Black to play draw! |
Trebuchet Technique ( This Technique arises in the above problem . So, you must know what it is and how it works)
The trebuchet is a complicated position that arises in king and pawn endgames.
It is a form of Zugzwang in which you don’t want to be the player with the move.
The basic example looks like this:
 |
| The trebuchet: whoever has the move loses |
When approaching the trebuchet, you need to carefully consider where not to move your king as you approach the pawns. Dvoretsky calls these mined squares in his endgame manual.
Consider this example, the squares highlighted are where the kings do not want to step.
If one king moves onto a mined square, the other king should occupy the other mined square on the next move to force diagram 2 above.
This results in a careful dance around these squares to win the position. If you can force your opponent to the mined square, you win the pawn and most likely the game, depending on the position.
Black must move his king after he moves to the mined square and there are no safe places to continue protecting the pawn on d5 so he must lose it.
This is simply an extension of the classical, one-square-apart opposition, which is the most useful concept in King and pawn endgames. The goal of giving long-distance opposition is usually to take the opponent into a position where he’ll be faced with a short-distance opposition that will allow you to decisively outflank him.
3.a) The Convoy
- The long march for the attacker king for queening the pawn.
 |
| Here , the king is behind the pawn but for queening the square pawn. Attacker King needs to be in front of his Pawn. |
An important position to understand. The King must open the way for the pawn.
This principle determines that in pawn endgames the King should always march in front of the pawn, opening up space for it. This concept applies in a general form to all pawn endgames and is based on the fact that the pawn is easily blockaded. The “King on the sixth in front of the pawn always wins” principle, which you already know, is an offshoot of this, more general one.
4. Rule of Square
The Rule of the Square is used to determine whether or not a passed pawn can queen when it is not supported by its own king and the enemy king is chasing it. The idea is shown by the diagram on the right.
The rule simply states if your opponent's king can enter the square then he can stop the pawn from queening.
In order to figure out quickly if the pawn will be able to promote safely or not, we can use the rule of the square. You count the number of squares to the eighth rank (in front of and including the pawn square). Here, there are six total squares (b3-b8) Then you count six squares to the left or right side on the eighth square (b8-g8) and create a box using those coordinates. The box drawn on the board to the left is the square that Black’s king would need to be in, in order to catch the White pawn.
So in this position, if it was Black to move then 1…Kg3 or 1…Kg4 would allow him to enter the box and he could catch the White pawn before it could promote: 1…Kg4 2.b4 Kf5 3.b5 Ke6 4.b6 Kd7 5.b7 Kc7 6.b8=Q+ Kxb8 1/2-1/2
However, if it is White’s move here, he can play 1. b4 and a new box have been created from b4-b8-f8. After b4, then Black’s king could not enter this new box and would not be able to catch White’s pawn: 1.b4 Kg4 2.b5 Kf5 3.b6 Ke6 4.b7 Kd7 5 b8=Q 1-0
Understanding this “rule of the square” concept is important when you are in a position where you need to know if you can track down an opponent’s passed pawn with your king or not. Being able to create this square in your mind quickly will also help you to cut down on the time you would need to calculate. Memorize this rule and chase those pawns down!
4.a) Reti Manuever
In principle, the King moves better through diagonal routes, making its future moves more unpredictable and maximizing its options. Like other pieces, the King also finds its value greatly expanded once it’s situated in the center, giving it greater freedom of movement and more numerous options
 |
| White to move N draw! black to move N win! |
By multitasking -- threatening to both advance towards the black pawn and to protect his own pawn’s promotion -- the white King manages to save the day.
This is the classic Reti’s Position, illustrating that the King moves better through diagonals and towards the center. Here white can draw, even though his King is far from the passed black pawn, by combining threats of supporting the c6 pawn with a gradual advance to the “square” (see below) of the black pawn. |
White is to move and draw in this position. At first inspection, it appears that White has no hope in the drawing. His king is well outside the "square" of the black pawn and the king is a long way from supporting his own pawn. However, White can draw by making king moves that have dual purposes. One goal is getting in the square of the black pawn, so it can be intercepted, and the other is getting to the d6-square to support the promotion of his pawn.
The black king will have to spend two tempi to stop the white pawn from promoting, and this is the number of tempi the white king needs to gain in order to get into the square of the black pawn.
The second diagram shows the number of ways that the white king can get to various squares in the minimum number of moves. There are nine ways to get to d6, but only one of them allows him to get into the square of the black pawn.
The solution is for the white king to follow the path on the diagonal marked by "1" and then follow the dots to intercept the black pawn (if necessary):
Richard Réti, 1921
- 1. Kg7! h4
1...Kb6 transposes.
- 2. Kf6 Kb6
Black has to spend a tempo on preventing the white king from reaching his pawn. If 2...h3 then 3.Ke7 h2 4.c7 Kb7 5.Kd7 and both pawns promote, with a drawn position.
- 3. Ke5! Kxc6
Black has to spend another tempo to capture the pawn, to prevent the white king from protecting it. If 3...h3 then 4.Kd6 h2 5.c7 h1=Q 6.c8=Q, draw (Müller & Pajeken 2008:12–13). Now the white king has gained enough tempi to get in the square of the black pawn and intercept it.
- 4. Kf4
Draw, since the white king can stop the pawn from promoting (e.g. 4...h3 5.Kg3 h2 6.Kxh2) (de la Villa 2008:179–80).
Study 2:
In this game between Frederick Yates and Frank Marshall, Black draws using the same idea:
- 60... Kb2!
If 60...Kc2? 61.f4 wins.
- 61. Kxa4
If 61.f4?? then 61...a3 wins.
- 61... Kc3!
- 62. f4 Kd4 ½–½ (Fishbein 1993:18–19), (Dvoretsky 2006:26–27)
Lasker versus Tarrasch
In this game between Frederick Yates and Frank Marshall, Black draws using the same idea:
- 60... Kb2!
If 60...Kc2? 61.f4 wins.
- 61. Kxa4
If 61.f4?? then 61...a3 wins.
- 61... Kc3!
- 62. f4 Kd4 ½–½ (Fishbein 1993:18–19), (Dvoretsky 2006:26–27)
- 5. Triangulation
- Defination:
- Triangulation is a tactic used in chess to put one's opponent in zugzwang (a position when it is a disadvantage to move). Triangulation is also called losing a tempo or losing a move. Triangulation can occur in other endgames and even in some middlegames.
Why should I learn it?
Sometimes you are in exactly the position you want to be in—except it’s your move, and you are forced to change this ideal position. That is what triangulation is for: reaching the same position, but with the opponent to move. This way he is forced to give up space while your pieces are in the optimal squares to take advantage of it.
When do I use it?
Triangulation happens most often in King and pawn vs King and pawn endgames. However, you’ll find it also a fixture in Queen vs Rook endings, as well as in a few others, occasionally. You use it, as explained above, to reach the same situation but having ceded the right to move.
- Triangulation problem #1
Step-by-Step Guide on Triangulation
It is White to move. Sometimes, to win, one has to fall back.
1. Kd4White prepares to jump into c5 if the Black king jumps into c7.
1…Kd8Black tries not to step on c7 too soon. - 2. Kc4
Still preparing to go to c5.
2...Kc7If Kc8, White would then play Kd5 and achieve the initial position with Black to move. That way, the Black king would still be forced to go to c7 at some point.
3. Kc5 (This is what White has been waiting for) 3...h5 (Somehow trying not to move its king. But this is not enough 3. …h6 4. h3 h5 5. h4) 4. h4
Blocking the pawn and thus forcing the Black king to move.
4...Kc8 (Going to b8 or d8 would not be any better). 5. Kb6 (try to capture a pawn and play with two passed pawn) 5... Kd8 (Moving to b8 would not change the outcome). 6. Ka6
The only winning move. 6...Kc7 (Threatening to take the pawn) 7. Kb5
The only winning move. This move lets White protect the c-pawn while also freeing up the a-pawn.
{(7. Ka7? Kxc6 8. Kb8 Kb5 9. Kc7 Kxa5 10. Kd6 Kb5 11. Ke5 Kc6 12. Kf5 Kd7 13. Kg6 Ke6 14. Kxh5 Kf6 15. Kg4 Kf7 16. h5 Kg7 17. Kg5 Kf8 18. Kg6 Kg8 19. h6 Kh8 is equal and thus a draw)
(7. Ka7? Kxc6 8. Ka6 Kc7 9. Kb5 Kb7 10. a6+ Ka7 11. Ka5 Ka8 12. Ka6 Kb8 13. a7+
Ka8 14. Ka6, stalemate)}
7...Kb8 (Black is in a dilemma on which pawn to stop) 8. a6
The other pawn advances.
(8. Kb6 is also winning. 8. …Ka8 9. a6 Kb8 10. c7+ Ka8 (10. …Kc8 11. a7) 11. c8=Q#)
8...Kc7 (Black chose to block the c-pawn while also preventing the White king from moving into b6. However, the a-pawn is now free to move forward).
9.a7
After this move, Black can no longer chase after White’s a-pawn because the b-file is controlled by White’s pieces.
9..Kd6Black runs off since the pawn is unstoppable
10. a8=Q black resigns.
Another example of Triangulation:
However, in order to get black to move, the white king must make three moves and arrive at the same position. It would be played out as below: Find out the solution...
This is another king and pawn end game position.
Triangulation is often achieved when you have multiple squares to move to, but your opponent only has 2. You can then move your king 3 times while your opponent only has 2 moves. This results in “giving the move back to your opponent.”
6. When King is ahead of 1 square from the Pawn
So, the king is in front of the pawn.
So this should be a win for white still, right?
The answer is: it depends whose move it is.Right now, if it is white to play, it’s a draw. If it is black to play, white wins.
In every king and pawn endgame, you will want to calculate if you can get to this with your opponent to move.
Let’s play out if white moves.
1. Ke5 Ke7 2. Kd5 Kd7 3. Kc5 Kc7 4. d5
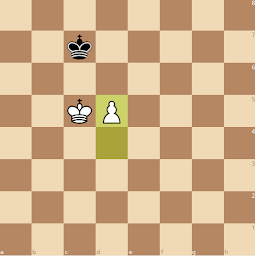
White can’t make any progress, so the pawn is pushed to try to see if black reacts properly.
4…Kd7 5. d6 Kd8 6. Kc6 Kc8 7. d7+ Kd8 8. Kd6
And we have the same stalemate.
What about if it’s black to play? Why does white win? Because black must give away the opposition.
1… Kc7 2. Ke6 Kc8 3. Ke7 Kc7 4. d5

White has achieved the “dream square” for the king.
4…Kc8 5. d6 Kb7 6. d7 Kc7 7. d8=Q+
7. When King is ahead of 2 square from the Pawn
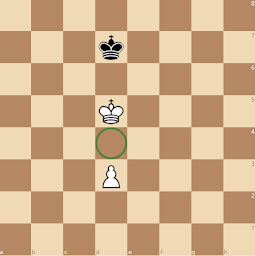
In this position, it doesn’t matter whose move it is. White will win.
The key here is the square between the white king and its pawn.White wins, regardless of whose move it is. This, however, is a win for white no matter whose move it is
1. d4 Now white maintains the opposition and black must give way. Then the queening pattern is the same as we’ve already seen.
1…Ke7 2. Kc6 Kd8 3. Kd6 Kc8 4. d5 Kd8 5. Kc6 Kc8 6. d6 Kd8 7. d7 Ke7 8. Kc7 Ke6 9. d8=Q
8. When King is in the 6th rank
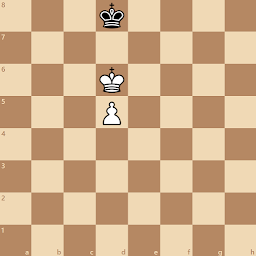
After reaching this position, whoever moves it is white wins! The promotion of the pawn into a queen will result in an easy checkmate with a queen.
1. Kc6 Kc8 2. d6 Kd8 3. d7
The key is when you push your pawn, your opponent’s king has to vacate the queening square.
3…Ke7 4. Kc7 Kf6 5. d8=Q+
Or
1. Kc6 Ke7 2. Kc7
If the king doesn’t maintain opposition, then you can reach what I call the “dream square” for your king. Now you don’t have to move your king anymore and you can push your pawn safely the rest of the way. All three squares between the kings are protected by the king.
It’s important to note that black has the opposition, but it doesn’t matter because the king is separated from the queening square.
2…Kf7 3. d6 Ke6 4. d7 Ke7 5. d8=Q+
However, if we flip the king and the pawn, it’s a draw.
1. Kc6 Kc8 2. Kd5 Kd7 3. Ke5 Kd8 4. Ke6 Ke8 5. Kd5 Kd7 6. Kc5 Kd8 7. Kc6 Kc8
The kings are just bouncing back and forth with no progress. White is forced to try something else.
8. d7+
8…Kd8 9. Kd6
And the game ends in a stalemate.
What is the difference between how these king and pawn positions started?
The king needs to be in front of the pawn in this type of ending.
9.What if the pawn is closer to the edge of the board
While the previous position told us that the white king can move to either side to win, that is not the case when the pawn is closer to the edge.
If white plays Kf6, then black can try to trick white into a draw.
1. Kf6 Kh7 2. Kf7 kh8
And now white cannot play f6 or the position is a stalemate. White can save the position by moving to g6 and playing the correct first move.
1. Kh6 Kh8 2. g6 kg8 3. g7 kf7 4. Kh7 and the pawn queens.
The exception to the opposition where the king must move to h6 to win. Kf6 can be a draw after kh7
10. Rook Pawns are Usually Drawn
Rook pawns are always drawn if the King is in front of the pawn.
The reason is that there just isn’t enough space for the defending king to get forced away from the queening square.
Rook pawns are often the exception to winning endgames. You can often draw your opponent despite all of the other rules we’ve seen in this article.
However, the game can also be drawn even if the black king is not in front of the pawn.
Black to move and draw
1…Kf7!
Trapping the white king and not allowing it to escape from the h file without giving away control of the queening square.
2. h6 Kf8 3. Kh8 Kf7 4. Kh7 Kf8
It would be a draw if the kings move back and forth, so the white king tries to leave the h file and promote the pawn.
5. Kg6 Kg8 6. h7+ Kh8 7. Kh6
Now that the black king is in front of the pawn, it’s a draw.
11. Let’s try to get to this position now from further out.
Now that we understand the main ideas, let’s make a queen for white. It’s important to understand everything we’ve learned so far. First, let’s get to the space between the king and the pawn position we just saw.
White to play and win. What is the main idea?
1. Kd2 Kd7 2. Kd3 Ke6 3. Ke4
Great! Now black must give away the opposition and the rest is easy.
3…Kd6 4. Kf5 Ke7 5. e3 Kd6 6. e4 Ke7 7. Ke5
White grabs the opposition and black must move again.
Kd7 8. Kf6 Ke8 9. Ke6 Kf8 10. e5 Ke8
And even though white must give away the opposition, it’s a win because the pawn is on the 5th rank and the king is on the 6th.
11. Kd6 Kd8 12. e6 Ke8 13. e7 Kf7 14. Kd7 Kf6 15. e8=Q
To recap:
This is a draw if it is white’s move and an important point to avoid for white and attain for black to save the game.
This, however, is a win for white no matter whose move it is
Once you get the pawn to the 5th and the king to the 6th, it’s a win no matter who has the move
12. How to Draw with a Lone King vs a Pawn and King?
All of this assumes black played the right way. Now that we see how to win with white, let’s learn how to defend with black.
If you remember nothing else, remember this: Always keep the king in front of the pawn when you can.
White can play tricks, and out of order from what we’ve seen in this article. The key is to always understand where to move your king.
Black can accidentally make a loss from a draw, so watch out for tricks! Let’s flip the board and see.
Black only has 3 legal moves: d8, c7, and b8. Two lose and one draws.
If we follow our one rule, this is easy to see.
c7 is the only move. The others lose.
Let’s see if white tries to confuse black before pushing the pawn too far in a drawn position.
Black to play. Where should the king move?
1… Ke7 2. Kd5 Kd7 3. Kd4
Now the black king must make a decision since white moved backward. The best answer is always in front of the pawn
3…Ke7 4. Kd5 Kd7 5. Kd4 Ke6 6. Ke4 Kf7 7. Kf4 Ke7 8. Kf5
White is being stubborn and trying the other side of the board. Where must black go? Opposition!
Even if white tries to confuse you by moving differently than expected, as long as the pawn is ahead of the king and black can maintain opposition or get in front of the pawn, then it should be a draw with the best moves.
Practice positions to understand when it’s a draw and when it’s a win
Take a look at these example positions and try to determine if they are a win or a draw right away. (Hover over them for the answeR)
Assume it is white to play in all of them. (as a bonus, try to think of what happens if it’s black to play).
You can never lose a king and pawn vs king ending if you have the pawn, but it sucks when you draw after you had a win.
I hope you remember these scenarios in your games. You may be surprised how often they come up in your games.
If you learned something new, post it in the comments!




Comments
Post a Comment